

Filtering Keywords
KeywordsHow to use filters to better understand your keyword data
AccuRanker and AccuLLM let you build, save, and reuse filters across your list and overview pages. You can combine filters with nested AND/OR logic, save them as reusable Segments (with flexible sharing scopes), turn them into dynamic tags in one click for AccuRanker, and apply keyword-level and prompt-level filters across every keyword or prompt data-based page across the application! This guide walks you through each feature step by step.
Table of Contents
- The Filter Bar and Add Filter Popover
- Nested Filter Groups (AND/OR) and the Builder
- Saving and Reusing Filters with Segments
- Dynamic Tags
- Filters on the Domains and Brands Overviews
- Using Filters and Segments via the REST API
- FAQ and Troubleshooting
The Filter Bar and Add Filter Popover
Filters live in the bar at the top of every page that uses keyword or prompt data (Keywords, Tag Cloud, Keyword Discovery, Site Mapping, Domains, Brands, Prompts, Sources, and more). The Add Filter popover lets you quickly find the filter you need, whether you know its name or want to browse.
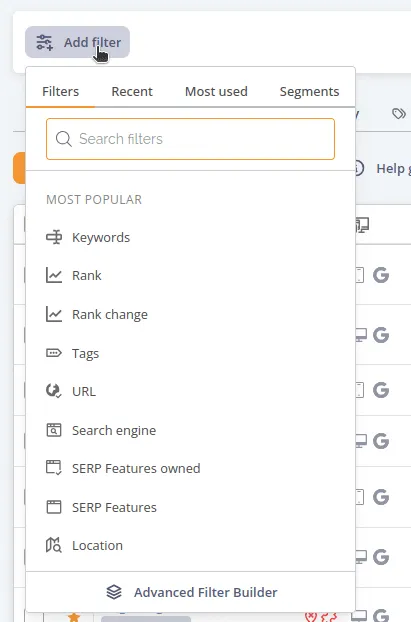
Adding a filter
- Click “Add Filter” in the filter bar.
- Stay on the Filters tab to browse, or start typing in the search box to jump straight to a filter by name.
- When browsing, filters are grouped into categories.
- Click a filter to add it, then set its value, and apply.
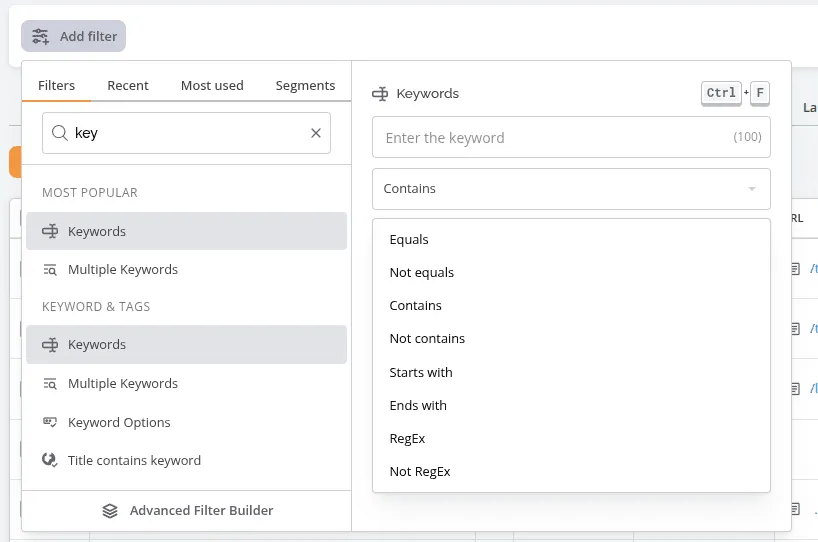
Different filters have different mechanisms and options when adding them. The keyword filter is probably the most common, and by default you filter by keywords that contain the text you have written — but there are also several other options ranging from a simple "equals" filter to more complex RegEx filters
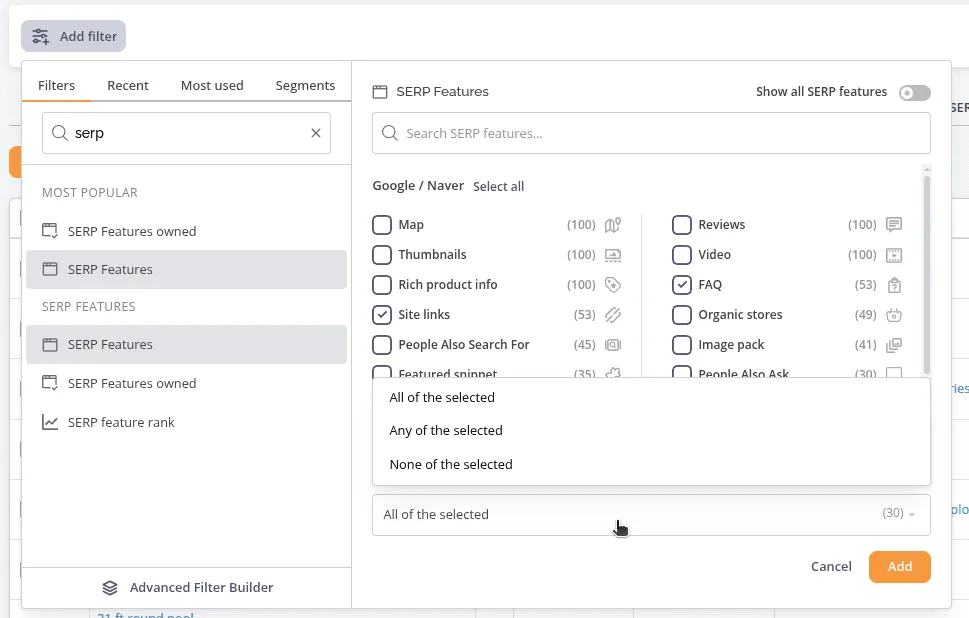
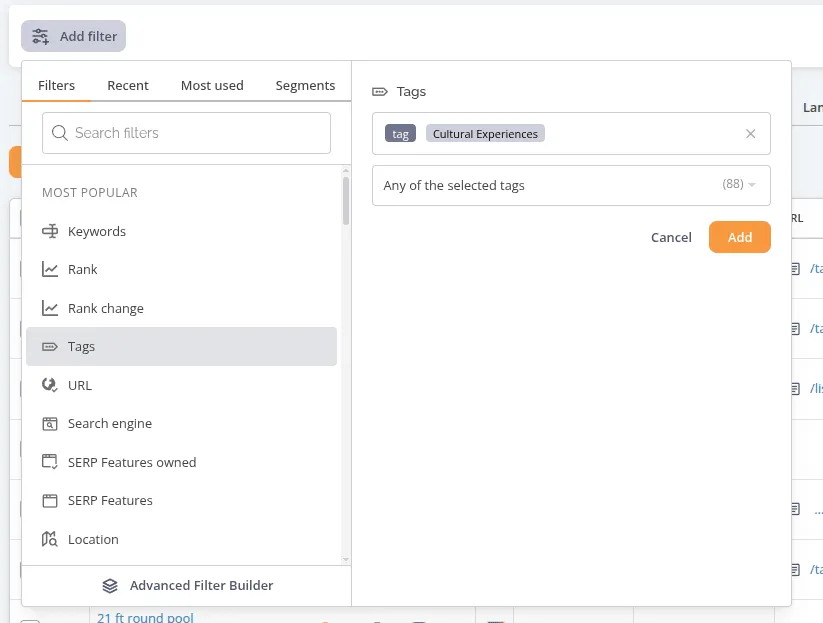
Other filters such as SERP Features or Tags have a limited set of options (the SERP Features detected on your SERPs, and the tags on your keywords).
Most popular filters
At the top of the Filters tab, you will see Most popular featured filters tailored to the page you are on. For example, the Keywords list surfaces filters like Keyword, Tags, and Highest Ranking Page; the Domains overview surfaces Domains, Clients, and Folders; and AccuLLM Prompts surfaces Prompt and Tags. These shortcuts put the filters you reach for most at your fingertips.
The Recent, Most used, and Segments tabs
The add filter menu has three more tabs besides Filters:
- Recent: Filters you have applied recently (prioritizing filters used on the current domain if relevant).
- Most used: The filters you apply most often (prioritizing filters used on the current domain if relevant).
- Segments: Your saved segments visible in the current scope, grouped under Personal, Shared with Org, For this domain, and For this group.
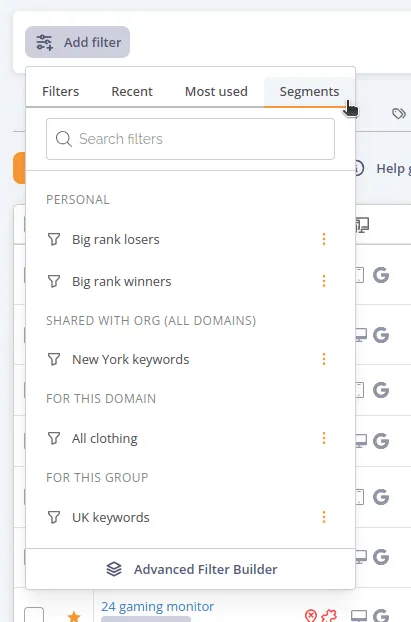
Keyboard navigation
You can use the popover entirely from the keyboard: use the arrow keys to move through the list and press “Enter” to select a filter.
Saving your filters
Once you have one or more filters applied, a “Save Filters” button appears in the bar. See Saving and Reusing Filters with Segments for what you can do with it.
Nested Filter Groups (AND/OR) and the Builder
Filters support nested AND/OR logic. You can group rules, mix AND and OR, and rearrange everything by dragging. To build nested filters, open the Advanced Filter Builder:
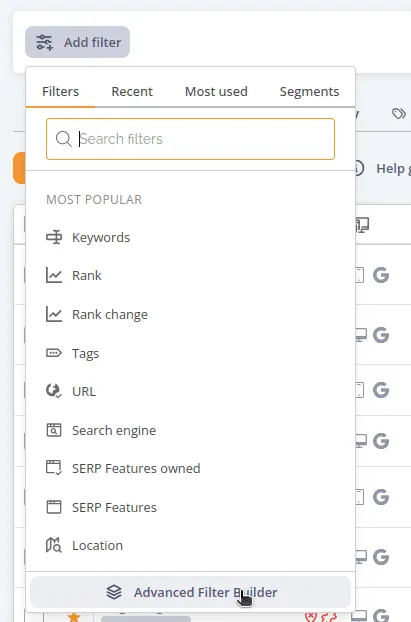
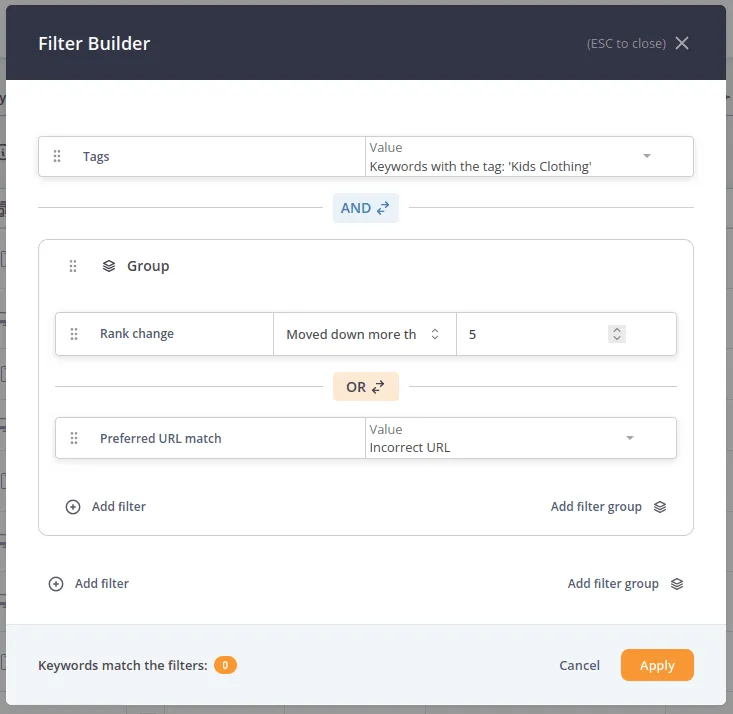
Toggling a group's operator
Each group has its own operator toggle. Switch a group between AND and OR at any time. Groups can be nested several levels deep so that you can express precise combinations of conditions.
Adding and removing rules
- To add a rule, use "Add Filter” and place it in the group you want.
- To remove a rule, use the remove control on that rule's row.
Reordering with drag-and-drop
- Click and hold a rule's drag handle.
- Drag it up or down to reorder it within its group, or drag it into a different group to move it.
- Release to drop it in place.
Saving and Reusing Filters with Segments
A segment is a named, saved set of filters that you can reapply at any time and, optionally, share with your organization.
Saving your current filters as a segment
- Apply the filters you want.
- Click “Save Filters”.
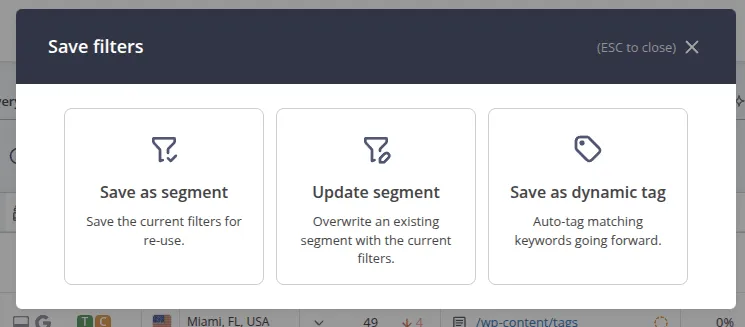
- In the chooser, pick the Save as segment card ("Save the current filters for re-use.").
- Enter a name.
- Choose a Scope (see below).
- If your filters include a change/compare attribute, pick a compare period (see below).
- Save.
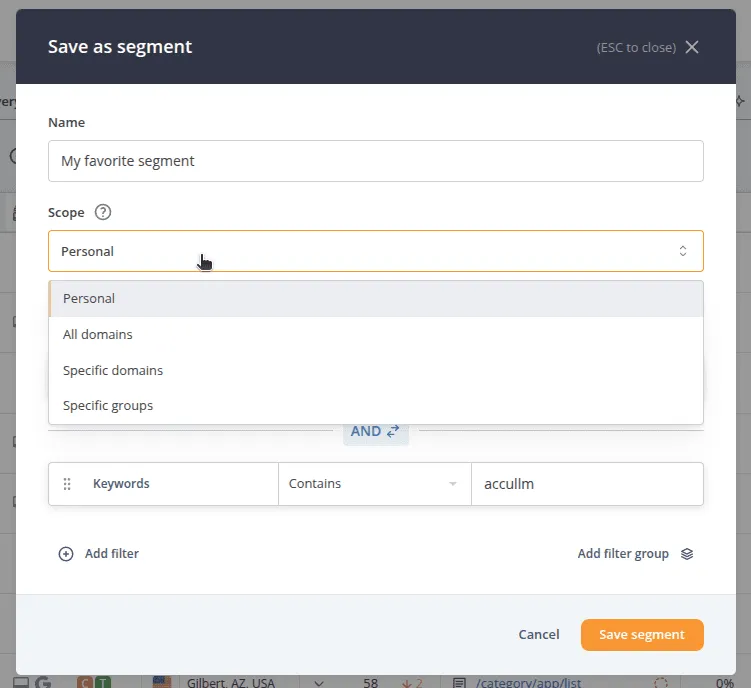
The four scope types
The Scope picker controls who sees the segment and where:
- Personal: Visible only to you.
- All domains: Shared across your entire organization, on every domain.
- Specific domains: Appears only when one of the chosen domains is in scope. Selecting this scope reveals a domain picker.
- Specific groups: Appears only when one of the chosen groups is in scope. Selecting this scope reveals a group picker.
The compare-period field
When your filters include a change or compare attribute (for example, rank change or visibility change), a compare period field appears. It is required — there is no silent default, so you choose the comparison window explicitly. The available options include, for instance, yesterday, a month ago, or specific dates.
Each segment remembers its own compare period. So a segment built around "rank change > 5" always reopens with the right comparison window, regardless of what was last in the bar.
Cross-page availability
Segments follow you between related pages:
- A segment created on Keyword Discovery, Tag Cloud, or Site Mapping is automatically available on Keywords (and vice versa).
- A segment created on Prompt Tag Cloud or Prompt Sources is available on Prompts (and vice versa).
If a page does not support one of the attributes in a segment, that attribute is greyed out on that page rather than breaking the segment.
The Segments tab and per-row actions
Open the Segments page (or the Segments tab in the Add Filter popover) to manage everything you have saved.
- Edit: Change the segment's name, filters, scope, or compare period.
- Duplicate: Create a copy you can adjust.
- Update from current filters: Overwrite this segment with whatever is currently in the bar.
- Delete: Remove the segment.
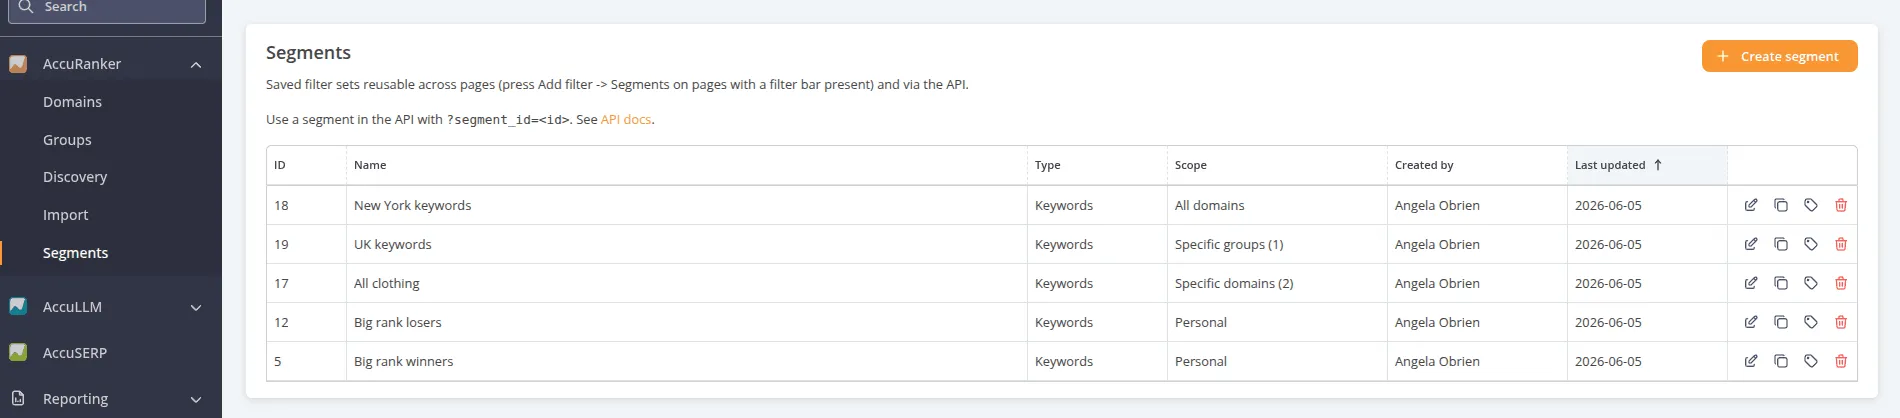
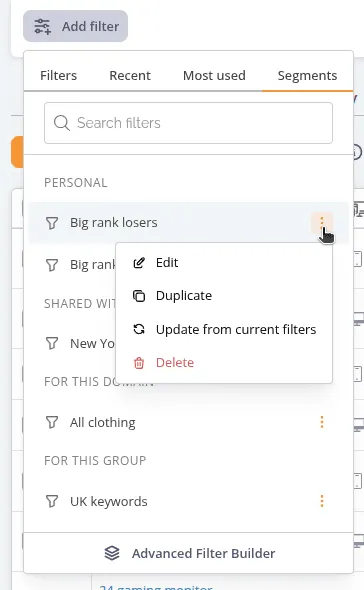
Updating a segment from the bar
You can also update a segment without opening the Segments page:
- Adjust the filters in the bar.
- Click “Save Filters”, then the Update segment card ("Overwrite an existing segment with the current filters.").
- Pick the segment to overwrite from the drop-down and confirm.
Dynamic Tags
Dynamic tags automatically tag matching keywords going forward. Any filter you can use in the bar, you can also use as a dynamic-tag rule — dynamic tags are at complete parity with filters: anything you can filter by, you can auto-tag by.
For a complete walkthrough of dynamic tags — building filter logic, comparison rules, and deploying or editing a tag across many domains — see the Dynamic Tagging guide.
Creating a dynamic tag
- Open the dynamic-tag creation flow for a domain.
- Build your rules using the same Builder described in Nested Filter Groups (AND/OR) and the Builder — including nested AND/OR groups and the full filter catalog.
- If your rules use a change/compare attribute, set the compare period (just like segments).
- Save. Matching keywords are tagged automatically, and new keywords are tagged as they qualify.
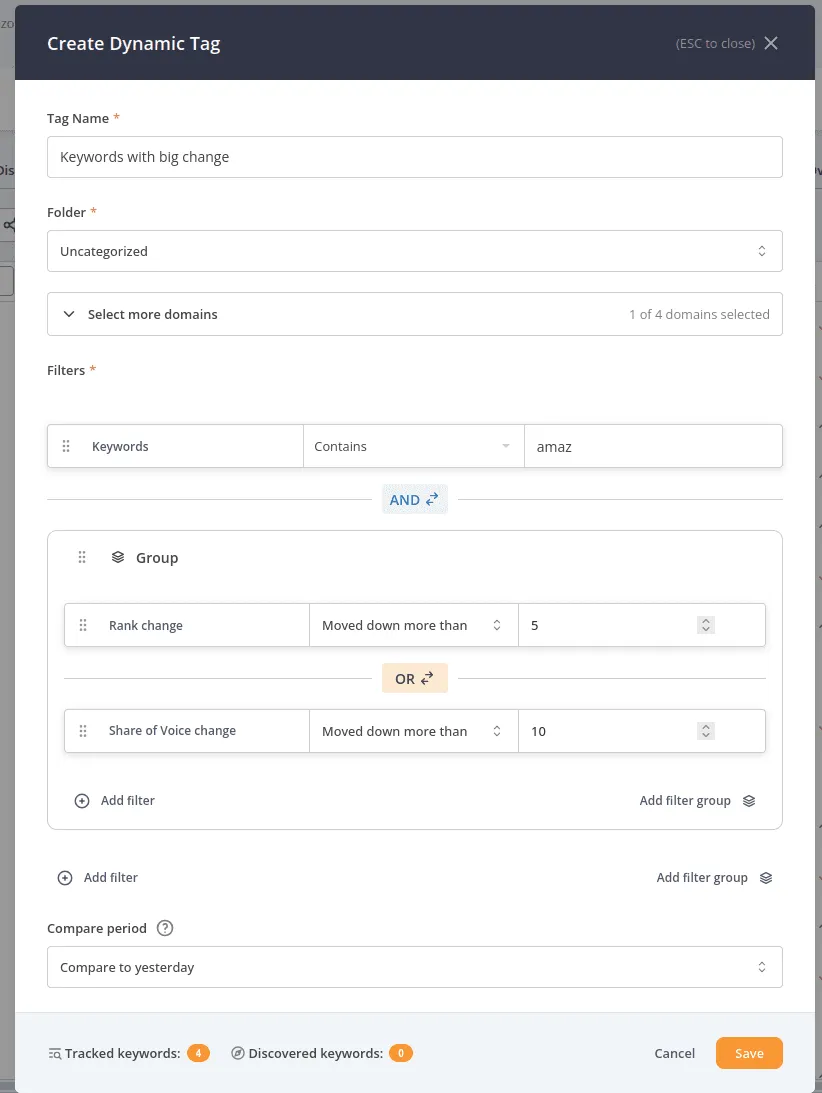
Save as dynamic tag, straight from the filter bar
If you have already dialed in the right filters on the keyword list, you do not need to rebuild them:
- Apply your filters.
- Click “Save Filters”, then the Save as dynamic tag card ("Auto-tag matching keywords going forward.").
- The tag modal opens pre-filled: your current filters become the tag's rules, and the page's domain context is set as the target (single-domain pages start with that domain pre-selected).
- Name the tag and save.
(The Save as dynamic tag option appears where it applies. On pages where it is not relevant, the chooser skips it.)
Bulk create across multiple domains
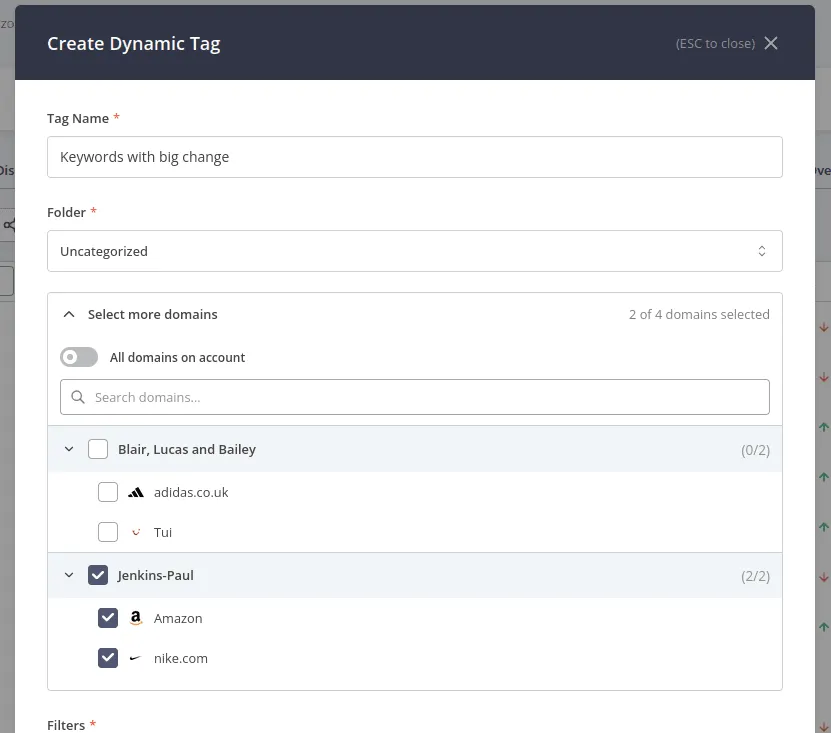
To deploy the same dynamic tag on several domains at once, use the Grouped Domain Picker:
- In the dynamic-tag flow, open the Grouped Domain Picker.
- Expand or collapse clients/groups to find the domains you want.
- Use the checkboxes to select as many domains/brands as you need.
- Submit once to create the ruleset on every selected domain.
Bulk edit across all domains
You can also edit a tag's rules everywhere the tag is deployed in a single modal. Change the rules once, and the update applies across all the domains that use that tag.
Filters on the Domains and Brands Overviews
Filters work on the overview pages too, not just the keyword and prompt lists. It means you can answer questions like "which domains have keywords that lost more than 1000 Share of Voice?" or "how do my domains compare for the 'Men's clothing' tag" without leaving the overview.
Domains overview
On the Domains overview, you can apply the full keyword-level filter set. The overview then shows only the domains that have at least one keyword matching your conditions. It shows the stats for those keywords; for instance, it could be the average rank across your domains for keywords with a certain tag.
Brands overview (AccuLLM)
On the LLM Brands overview, you can apply the full prompt-level filter set. The overview then shows only the brands that have at least one prompt matching your conditions. It shows the stats for those prompts; for instance, it could be the average rank across your brands for prompts with a certain tag.
Using Filters and Segments via the REST API
Filters and segments are fully available through the AccuRanker REST API so that you can reproduce the same filtering in scripts and integrations. Find your segments under /app/segments - learn more about the filter integration in the API here and here.
FAQ and Troubleshooting
Where do I find my saved filters/segments?
All your saved filters live as Segments. Find them on the Segments page or under Add Filter → Segments.
Why is a filter greyed out?
The current page does not support that attribute. A segment can carry attributes from another page; on a page that cannot use one of them, that attribute is greyed out rather than removed, so the rest of the segment still works.
Can I share a segment with my whole team?
Yes. Save it (or edit it) with the All domains scope to share it across your entire organization. Or pick specific groups or domains.
Can I share a segment with only some clients or domains?
Yes. Use the Specific domains or Specific clients/groups scope and pick the relevant domains or clients. The segment then appears only when one of those is in scope.
How do I make a segment usable from the API?
It is usable in the API by default. Simply reference it with?segment_id=<id>.
Why do all "AND" / "OR" badges switch when I click one of them?
All badges that belong to the same "nesting level" will switch when you click them, as having mixed AND/OR on the same level produces inconsistent results. Example:
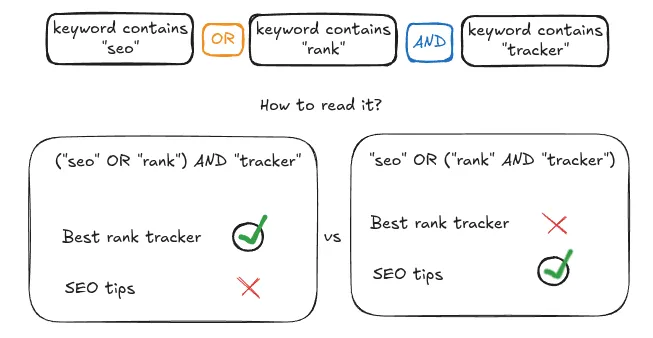
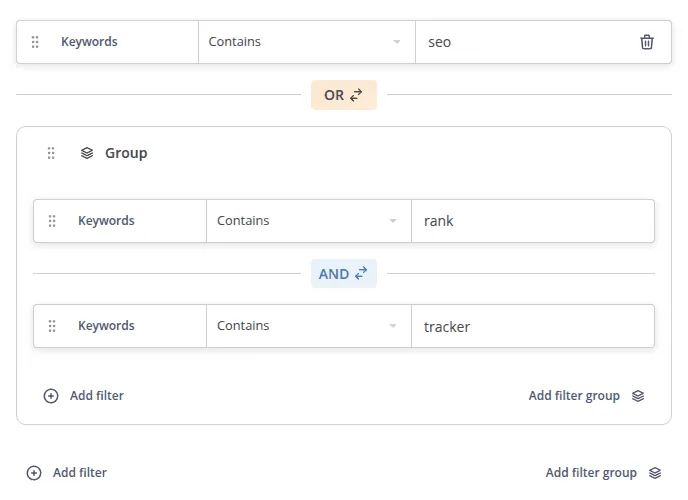
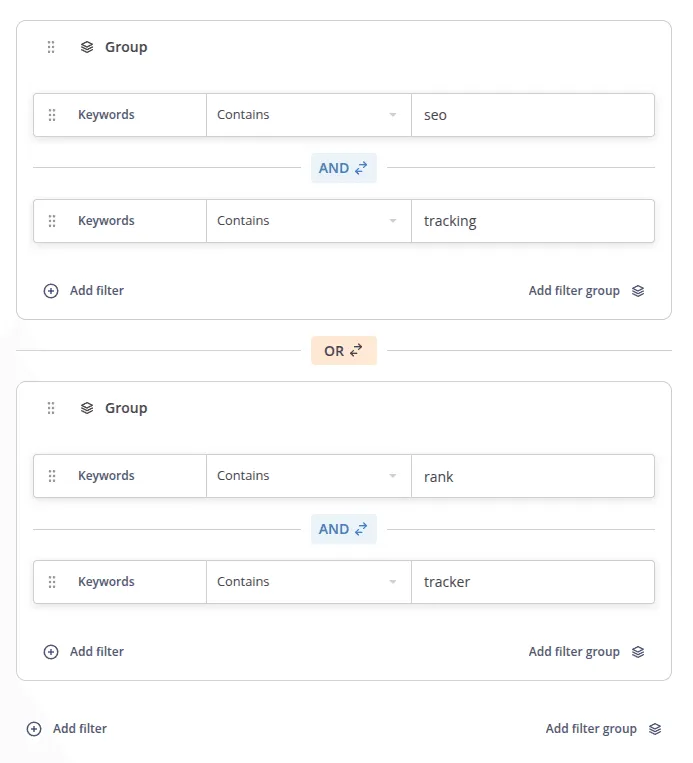
So in AccuRanker, if you want to achieve such mixes of AND/OR, what you do is to create the appropriate groups:
Or you might even need several groups:
Still need help?
Customer support
Our live support team is ready to assist you with any issues.